| 일 | 월 | 화 | 수 | 목 | 금 | 토 |
|---|---|---|---|---|---|---|
| 1 | 2 | 3 | 4 | 5 | 6 | 7 |
| 8 | 9 | 10 | 11 | 12 | 13 | 14 |
| 15 | 16 | 17 | 18 | 19 | 20 | 21 |
| 22 | 23 | 24 | 25 | 26 | 27 | 28 |
- Combine입문
- CURSOR
- CurrentValueSubject
- tryMap
- Codex사용법
- Combine개념
- iOS기술블로그
- RxSwift에서Combine
- compactMap
- 비동기
- RxSwift비교
- ChatGPTCodex
- 코딩에이전트
- SwiftCombine
- Cocoapods
- FilteringOperator
- autoLayout
- Swift
- priority
- removeDuplicates
- RxSwift
- Codex리뷰
- PassthroughSubject
- 라이브러리
- hugging
- replaceNil
- ios
- Combine
- Publisher
- AI개발도구추천
- Today
- Total
Tong's Blog
[iOS] Content Hugging 와 Compression Resistance 에 대해 (2) 본문
안녕하세요.
오늘은 지난 시간에 알아본 Content Hugging Priority 에 이어서 Compression Resistance Priority 에 대해 알아보겠습니다.
Content Compression Resistance Priority
https://developer.apple.com/documentation/uikit/uiview/1622465-contentcompressionresistanceprio
Apple Developer Documentation
developer.apple.com
Returns the priority with which a view resists being made smaller than its intrinsic size.
resistance priority 는 hugging priority 와 반대로 작아지지 않도록 하는 우선순위라고 합니다.
요 내용도 예시를 통해서 알아보겠습니다.
지난번에 사용한 UI 코드를 재사용하겠습니다. (Ex: 제품과 가격)
    private func setUp() {
        nameLabel.text = "완전 긴 이름을 가진 제품명: Tong"
        nameLabel.font = .boldSystemFont(ofSize: 20)
        nameLabel.backgroundColor = .black
        nameLabel.textColor = .white
        nameLabel.translatesAutoresizingMaskIntoConstraints = false
        view.addSubview(nameLabel)

        priceLabel.text = "가격: 1,000,000,000,000원"
        priceLabel.font = .boldSystemFont(ofSize: 20)
        priceLabel.backgroundColor = .gray
        priceLabel.translatesAutoresizingMaskIntoConstraints = false
        view.addSubview(priceLabel)

        NSLayoutConstraint.activate([
            nameLabel.centerYAnchor.constraint(equalTo: view.safeAreaLayoutGuide.centerYAnchor, constant: 10),
            nameLabel.leadingAnchor.constraint(equalTo: view.safeAreaLayoutGuide.leadingAnchor, constant: 10),

            priceLabel.topAnchor.constraint(equalTo: nameLabel.topAnchor),
            priceLabel.leadingAnchor.constraint(equalTo: nameLabel.trailingAnchor, constant: 10),
            priceLabel.trailingAnchor.constraint(equalTo: view.safeAreaLayoutGuide.trailingAnchor, constant: -10)
        ])
    }
Hugging Priority 와 다른 점은 Hugging Priority 에서는 고유 크기가 작아 남는 공간에서의 Priority 를 결정하는 반면 Resistance Priority 에서 고유 크기가 커서 서로의 사이즈를 경쟁하는 경우에서 사용합니다.
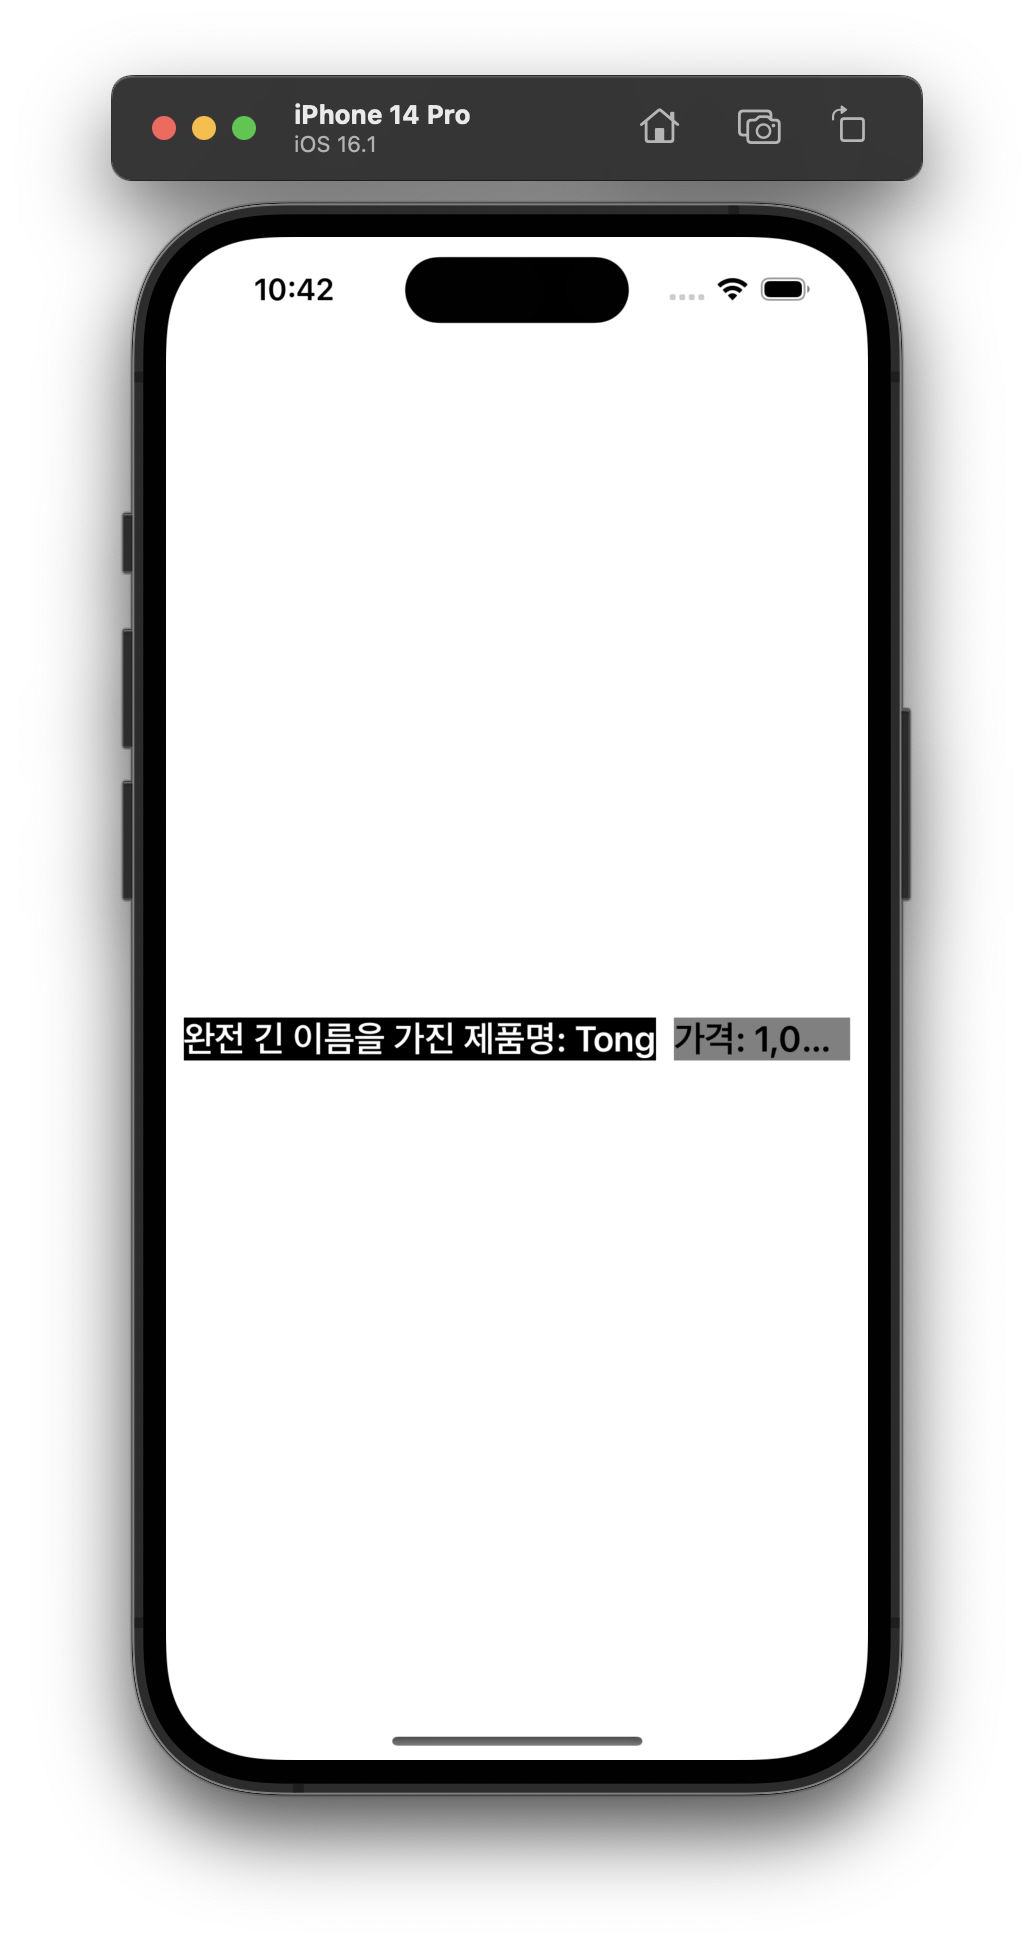
두 Label 의 Compression Resistance Priority 는 같지만 임의로 nameLabel 의 고유 크기를 유지하고 있습니다. 만약 name 은 조금 짤리더라도 가격은 전부 노출되어야 하는 요구사항이 있다면 어떻게 해야할까요?
priceLabel 이 고유 크기를 가지도록 구현하면 자연스럽게 nameLabel 크기가 줄어들테니 해당 요구사항이 만족할 것 같네요.
이럴 경우에 사용하는 게 바로 Compression Resistance Priority 입니다.
위에서 인용한 내용을 다시 가져오자면
"intrinsic size 보다 작아지지 않도록 하는 우선순위"
우리는 priceLabel 이 더 작아지지 않도록 (즉, 고유 크기를 가지기 위해) 해당 우선순위를 높이면 된다는 뜻이 됩니다.
hugging priority 의 기본값은 250 이였는데
compression resistance priority 값은 어떨까요?
let resistancePriority = nameLabel.contentCompressionResistancePriority(for: .horizontal)
print(resistancePriority)

// print 결과:
// UILayoutPriority(rawValue: 750.0)
hugging priority 와 달리 750 으로 값이 나타납니다.
우리가 원하는 건 priceLabel 의 사이즈가 작아지지 않도록 하기 위함이니 priceLabel 의 compression resistance priority 우선순위를 높아주거나 nameLabel 의 우선순위를 낮춰주면 됩니다.
nameLabel.setContentCompressionResistancePriority(.init(rawValue: 749), for: .horizontal)그러면 아래와 같은 결과물을 얻을 수 있습니다.

priceLabel 의 compression resistance priority 우선순위가 nameLabel 보다 높아져 더 이상 작아지지 않고 고유 크기를 유지하도록 된 모양을 확인할 수 있습니다.
두 글에 걸쳐서 Priority 에 대해 알아보았습니다.
결국 두 Priority 는 각 view 가 가지는 고유크기에 대한 우선순위입니다.
다만 커지지 않게 하는 우선순위냐 작아지지 않게 하는 우선순위냐, 즉 공간이 남을 때와 공간이 모자를 때 사용한다고 이해하시면 좋을거 같습니다.
오늘도 글 읽어주셔서 감사합니다.
전체코드 첨부합니다.
import UIKit

class ViewController: UIViewController {

    let nameLabel = UILabel()
    let priceLabel = UILabel()

    override func viewDidLoad() {
        super.viewDidLoad()
        // Do any additional setup after loading the view.
        setUp()
    }

    private func setUp() {
        nameLabel.text = "완전 긴 이름을 가진 제품명: Tong"
        nameLabel.font = .boldSystemFont(ofSize: 20)
        nameLabel.backgroundColor = .black
        nameLabel.textColor = .white
        nameLabel.translatesAutoresizingMaskIntoConstraints = false
        view.addSubview(nameLabel)

        priceLabel.text = "가격: 1,000,000,000,000원"
        priceLabel.font = .boldSystemFont(ofSize: 20)
        priceLabel.backgroundColor = .gray
        priceLabel.translatesAutoresizingMaskIntoConstraints = false
        view.addSubview(priceLabel)

        let resistancePriority = nameLabel.contentCompressionResistancePriority(for: .horizontal)
        print(resistancePriority)
        nameLabel.setContentCompressionResistancePriority(.init(rawValue: 749), for: .horizontal)

        NSLayoutConstraint.activate([
            nameLabel.centerYAnchor.constraint(equalTo: view.safeAreaLayoutGuide.centerYAnchor, constant: 10),
            nameLabel.leadingAnchor.constraint(equalTo: view.safeAreaLayoutGuide.leadingAnchor, constant: 10),

            priceLabel.topAnchor.constraint(equalTo: nameLabel.topAnchor),
            priceLabel.leadingAnchor.constraint(equalTo: nameLabel.trailingAnchor, constant: 10),
            priceLabel.trailingAnchor.constraint(equalTo: view.safeAreaLayoutGuide.trailingAnchor, constant: -10)
        ])
    }
}'iOS' 카테고리의 다른 글
| [iOS] Cursor 에 iOS(Xcode) 에 맞는 Rules 설정하기 (0) | 2025.08.21 |
|---|---|
| [iOS] Cursor 에 iOS(Xcode) 프로젝트 연동하기 (5) | 2025.07.16 |
| [iOS] Content Hugging 와 Compression Resistance 에 대해 (1) (0) | 2023.02.15 |
| [iOS] 라이브러리 만들기 (2) - Cocoapods 라이브러리에 SPM 이식하기 (0) | 2021.01.02 |
| [iOS] 라이브러리 만들기 (1) - Cocoapods 프로젝트 생성 (0) | 2020.12.26 |


